


If you want to add a new product to your PrestaShop store, from the column on the left, in the Sales menu, select Catalog and then the Products Subcategory. This will give you access to a dashboard where you can add, remove, or edit your store’s inventory.
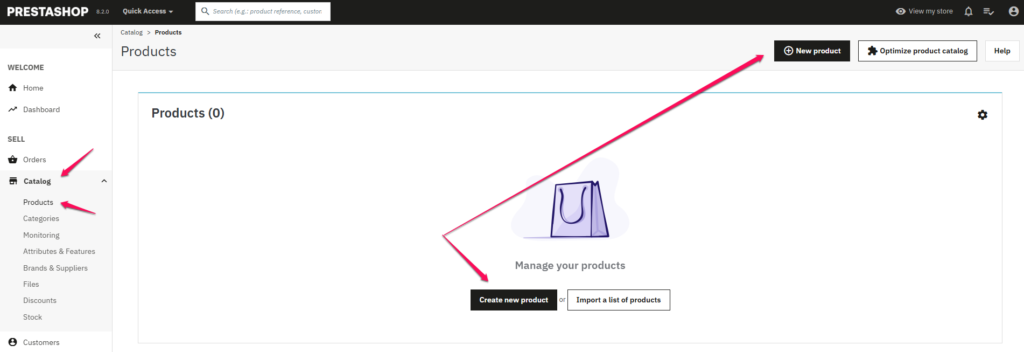
In the top right, select the +New product button. Once you press this option, you will be redirected to a new panel where you will create a new article step by step. First, enter the name and type of the product. You can choose from: a standard product, a product package and a virtual product.

A standard product is a physical item sold on your PrestaShop store, such as pants, a bicycle, or a chair. A Product Bundle is a set of at least two existing products, such as a table + chair, phone + case. A virtual product refers to the services, files, or applications that will be sold in an online store.

Below the Name and Type settings, 6 sections (tabs) are displayed, in which you need to set the basic information about the new product. Today, we will discuss the Basic Settings tab. These settings are the parameters and data that are visible in your store. Here, you should add product images, descriptions, features, brand, price, or other related products.
Table of Contents
Photos
Product images can be added in .jpg, .gif, or .png format. The minimum recommended photo size in a standard template is 800 x 800 pixels. Remember that the published photos should faithfully reflect the product offered and present it from different perspectives.
It’s good if these are photos taken specifically for your online store, and not downloaded from a supplier or distributor. Original photos can positively affect your store’s position in the search engine and make it stand out from the competition.
Combinations
Product combinations are nothing more than a short information about whether the product comes in one size and color, e.g. a book, or in several sizes, e.g. trousers.
By selecting Product with combinations, you’ll get access to advanced settings where you can enter product attributes such as size and color.
Index
In the Index field, enter your individual reference number for the product. Each product should have its own index so that you can quickly and accurately find the product in your store. This is an essential step for your PrestaShop store to work quickly and correctly.
Quantity
The Quantity field displays the store’s inventory for the product.
To integrate this item into your current inventory, you must enable the Advanced inventory management option.
Summary and description
The summary section is a concise description of a product that shows its most important features in one sentence.
This description is displayed at the top of the product page, in the search engine and in the product list. By default, the maximum length of this section is 800 characters.
The Description section is a full, detailed description of the product offered. Remember to keep this description as detailed as possible and, most importantly, original. Copying descriptions from manufacturers or competitors can result in a lower search engine ranking, not to mention the legal consequences of unauthorized copying of another company’s intellectual property. It is also worth taking care of the form of presentation of the description. Punctuation of features, clear paragraphs or text justification have a positive effect on the reception by potential customers. A detailed product description can be up to 21,844 characters.
Features
This is where you can specify the features of the product you offer. From the list of features, select the appropriate ones for the part and complete them in the Individual value field. You can also choose a preset value.
If you are just starting your adventure with an online store and the drop-down list of features is empty, you should create it beforehand. To do this, in the column on the left, select Sales and Catalog, and then Attributes & Features. In the Functions tab, press the +Add new feature button to define all the values necessary for your business. Keep in mind that the values you define are only used to show the assortment versions available in your store. It is not an option that allows you to choose, for example, the size or color of the product. This is an extremely useful setting for category filters to work properly.
Brand
To add a brand for your product, select the brand name from the drop-down list. If the list is empty, follow the same steps as the function.
From the left column, select Sales, Catalog, then Brands and Suppliers and in the appropriate tab, add a new brand or new supplier using the +Add new brand buttons or similarly, under the Suppliers tab, click the +Add new supplier button.
Related Product
By choosing a related product, you can suggest to customers what other items in the assortment are worth their attention. These products should complement each other or correspond with each other in some way.
For example, if you sell a table, you can offer chairs as part of a related product. The related products will be displayed on the product page at the bottom of the storefront. It’s a good idea to leave this part for the very last when all the products are loaded into your PrestaShop store. This way, you will have access to the full assortment of your store, and matching products with each other will be much easier and faster. You will avoid returning to the same product section repeatedly.
Price
In the Price section of the PrestaShop store, you can set the net price of the product, the gross price, and the amount of tax with which the item is sold. If you want to set more price attributes, visit the Pricing tab. You can enter, for example, the costs of purchasing the assortment, so that the profit calculation will be carried out automatically.
Categories
Categories are where a given product will be displayed on the store page. Depending on the industry and assortment, it is common for one product to be assigned to more than one category. Therefore, before you start adding products to your store, think carefully about the structure of the store and create all the categories you need. This way, you will save a lot of time when adding new products to your PrestaShop store.