


Mozilla Thunderbird includes built-in calendar functionality and supports the CalDAV protocol, allowing you to synchronize your Mybox calendar directly with the application.
Once configured, your events, appointments, reminders, and recurring meetings will automatically synchronize between Thunderbird and your Mybox account.
Table of Contents
Prerequisites

Before configuring Thunderbird, make sure that:
- CalDAV access has been enabled for your Mybox calendar.
- You have the CalDAV connection details.
- You know the username and password associated with the calendar.
Adding a CalDAV Calendar
Step 1
Open Mozilla Thunderbird.
Step 2
Switch to the Calendar view.
Step 3
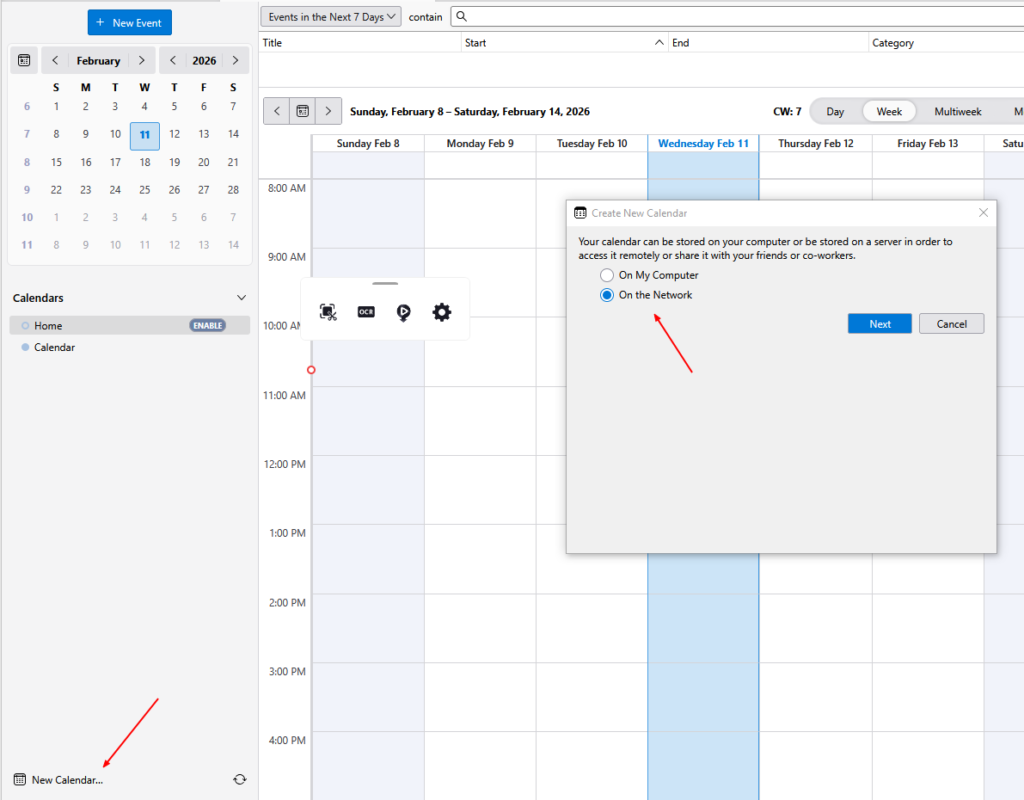
Click the + (Add Calendar) button.
Step 4
In the wizard that appears, select:
On the Network
or
Remote Calendar
depending on your Thunderbird version.
Click:
Next
to continue.
Entering CalDAV Details
Step 1
Select:
CalDAV
as the calendar type.
Step 2
Enter the CalDAV connection details provided for your Mybox calendar.
Typical information includes:
- Calendar URL
- Username (full email address)

Step 3
Click:
Find Calendars
Thunderbird will attempt to connect to the server and retrieve the available calendars.
Authentication
When prompted, enter the password associated with your CalDAV calendar.
Click:
Log In
to authenticate.
You may optionally allow Thunderbird to save the password for future use.

Subscribing to the Calendar
After successful authentication, Thunderbird will display the available calendars associated with your account.
Select the calendar you want to synchronize and click:
Subscribe
The calendar will then be added to Thunderbird.

Synchronization
After setup, Thunderbird will automatically synchronize:
- Events
- Meetings
- Reminders
- Recurring appointments
- Calendar updates
Changes made in Thunderbird will be synchronized with Mybox, and changes made in Mybox webmail will appear in Thunderbird during the next synchronization cycle.
Troubleshooting
If the calendar cannot be found or synchronized:
- Verify that CalDAV access is enabled.
- Check that the CalDAV URL is correct.
- Confirm that your username is the full email address.
- Verify that the password is correct.
- Ensure that Thunderbird can access the internet.
- Restart Thunderbird after making configuration changes.
Summary
To connect your Mybox calendar to Thunderbird:
- Open the Calendar view.
- Click Add Calendar.
- Select Remote Calendar.
- Choose CalDAV.
- Enter your CalDAV connection details.
- Authenticate using your calendar credentials.
- Click Subscribe.
Your Mybox calendar will then be synchronized automatically with Thunderbird.