


If you run an online store on the WooCommerce platform, setting up tax rates correctly is crucial for a legal and efficient business. In this article, we’ll show you how to set tax rates in WooCommerce step by step. You’ll also learn how to adjust taxes for different regions and how to set up VAT.
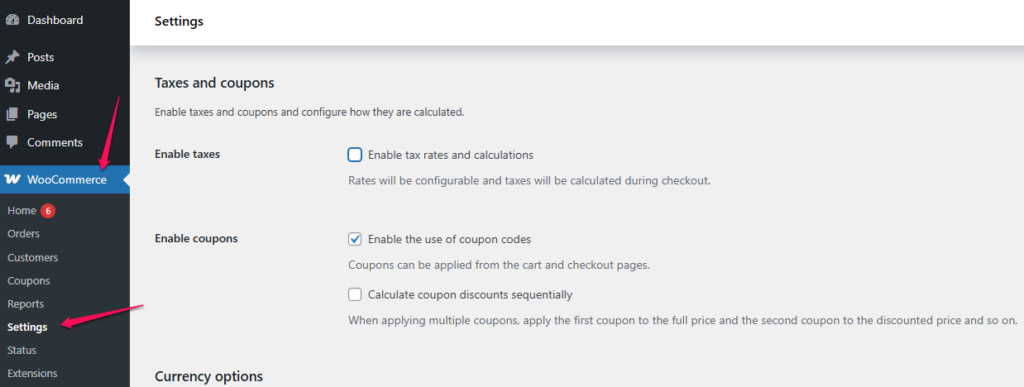
Table of Contents
How to enable the taxes option in WooCommerce?
Before you move on to setting up tax rates, you need to make sure that the taxes feature is active in WooCommerce.
- Go to WooCommerce > Settings.
- In the General tab, find the Enable taxes option and select it.
- Save your changes by clicking Save Changes.

Once taxes are enabled, a new tab called Tax will appear in the menu.
How do I set up base tax rates?
In WooCommerce, you can easily adjust the tax rates for different countries and regions.
- Go to WooCommerce > Settings > Tax.
- Click on the Basic Rates tab.
- Click Insert line to add a new tax rate.
Fill in the appropriate fields:
- Country code – e.g. “PL” for Polish.
- State/Province Code – Can be left blank if not applicable.
- Zip code – if you want to apply tax for a specific area.
- City – Optional if you want to limit the tax to a specific city.
- % rate – e.g. 23 for 23% VAT.
- The name of the tax – e.g. “VAT”.
- Priority – for applying different rates.
- Complex – Select if you want the tax to be overlapped with other taxes.
- Shipping -Select if you want the tax to be applied to shipping costs.
Click Save changes to approve the configuration.
How do I set up additional tax classes?
WooCommerce allows you to create different tax classes, e.g. for products with a reduced VAT rate.
- Go to WooCommerce > Settings > Tax.
- In the Additional tax classes section, add class names, such as “Reduced VAT” or “Zero VAT.”
- Click Save changes.
Once saved, the new classes will appear as separate tabs next to Base Rates.
How do I assign a tax class to a product?
For a product to have the correct tax rate applied, you must assign it the appropriate tax class.
- Go to edit the product in the Products tab.
- In the Product data section, select the General tab.
- In the Tax class field, select the appropriate class, such as “Reduced VAT”.
- Click Update to save your changes.
How to check the correct configuration of taxes?
Once you’ve set your tax rates, it’s a good idea to check that they’re working properly.
- Add the product to your cart and go to the order summary.
- Verify that the tax charged matches your configuration.
- If something isn’t working properly, go back to your tax settings and make sure that all the details are entered correctly.
With the right tax rate setup, your WooCommerce store will comply with applicable laws.