


Although mybox provides backups at the hosting level, you may also want to create additional backup points directly from your WordPress website. This can be useful before installing updates, modifying themes, adding plugins, or making significant changes to your website.
One popular plugin for this purpose is WPvivid Backup Plugin.
Important
By default, backups created by WPvivid are stored on your hosting account. This means that backup files consume disk space and may contribute to your hosting resource usage, especially on larger websites.
To avoid using local storage, consider configuring remote storage such as Google Drive, Dropbox, or Amazon S3.
Table of Contents
Install the WPvivid Plugin
- Log in to your WordPress administration panel.
- Navigate to:
Plugins → Add New- In the search field, enter:
WPvivid- Locate the WPvivid Backup Plugin in the search results.
- Click:
Install Now- After installation is complete, click:

Activate
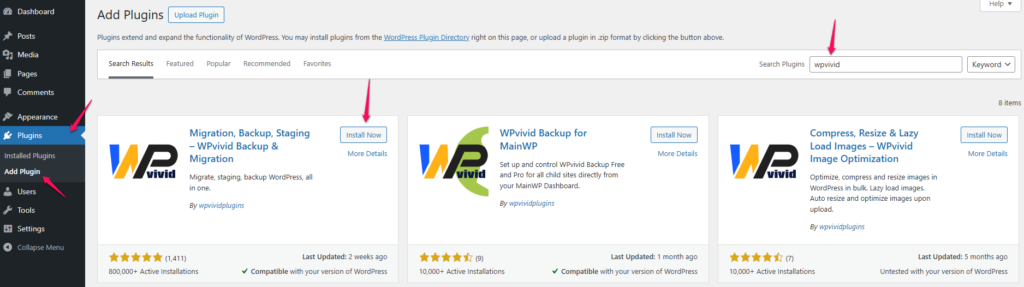
Access WPvivid
After activation, a new menu item will appear in the WordPress dashboard:
WPvivid BackupClick it to open the plugin interface.
Create Your First Backup
- Open:
WPvivid Backup → Backup & Restore- Click:
Backup NowThe plugin will begin generating a backup of your website.
Depending on the size of your website, this process may take several minutes.
The backup typically includes:
- Website files
- Themes
- Plugins
- Media uploads
- Database
Once the process is complete, a confirmation message will appear.
Restore a Backup
All created backups are listed in the Backup & Restore section.
For each backup point, you can:
- Restore the website.
- Download the backup files.
- Delete old backups.
To restore a backup:
- Locate the desired backup point.
- Click:
Restore- Confirm the operation.
The plugin will automatically restore the selected backup.
Download a Backup
To keep a copy on your computer:
- Locate the backup in the backup list.
- Click:
Download- Save the generated backup files locally.
This is recommended before making major website changes.
Configure Remote Storage
One of WPvivid’s most useful features is the ability to store backups on external services, even in the free version.
Navigate to:
WPvivid Backup → Remote StorageSupported storage providers include:
- Google Drive
- Dropbox
- Microsoft OneDrive
- Amazon S3
- DigitalOcean Spaces
- FTP servers
- SFTP servers
After connecting a remote storage service, new backup points can be automatically uploaded off-site, reducing storage usage on your hosting account.
Recommended Backup Strategy
For most websites, consider the following approach:
Before Major Changes
Create a manual backup before:
- Updating WordPress.
- Updating plugins.
- Updating themes.
- Installing new plugins.
- Editing website code.
Scheduled Backups
Configure automatic backups:
- Daily for online stores and frequently updated websites.
- Weekly for company websites and blogs with occasional updates.
Remote Storage
Store backup copies on an external service to protect against accidental deletion or website corruption.
Benefits of WPvivid
WPvivid offers several advantages:
- Easy backup creation.
- One-click restoration.
- Website migration functionality.
- Remote storage integration.
- Scheduled backups.
- Available free version.
Summary
WPvivid is a powerful WordPress backup solution that allows you to create and restore backup points directly from the WordPress dashboard.
To get started:
- Install and activate the WPvivid Backup Plugin.
- Open the Backup & Restore section.
- Click Backup Now to create a backup.
- Optionally configure Remote Storage to store backups on external services such as Google Drive or Dropbox.
Regular backups are one of the most important steps you can take to protect your website and its data.