


After installing PrestaShop, your store may initially operate over HTTP instead of HTTPS. As a result, visitors may see warnings indicating that the website is not secure.
To fully secure your store, you must first ensure that an SSL certificate is active for the domain and then enable SSL within the PrestaShop administration panel.
Table of Contents
Before You Begin

Make sure that:
- Your store’s domain has been added to the mybox Panel.
- An SSL certificate is active for the website.
- The domain resolves correctly to your hosting account.
Step 1: Verify That SSL Is Active
Log in to the mybox Panel and navigate to:
Websites
Locate the website associated with your PrestaShop store.
Verify that SSL is active for the domain. A valid SSL certificate should be assigned before proceeding with the next steps.
If SSL is not yet active, wait until the certificate has been issued successfully.
Step 2: Log In to the PrestaShop Administration Panel
Access your store’s back office using an administrator account.
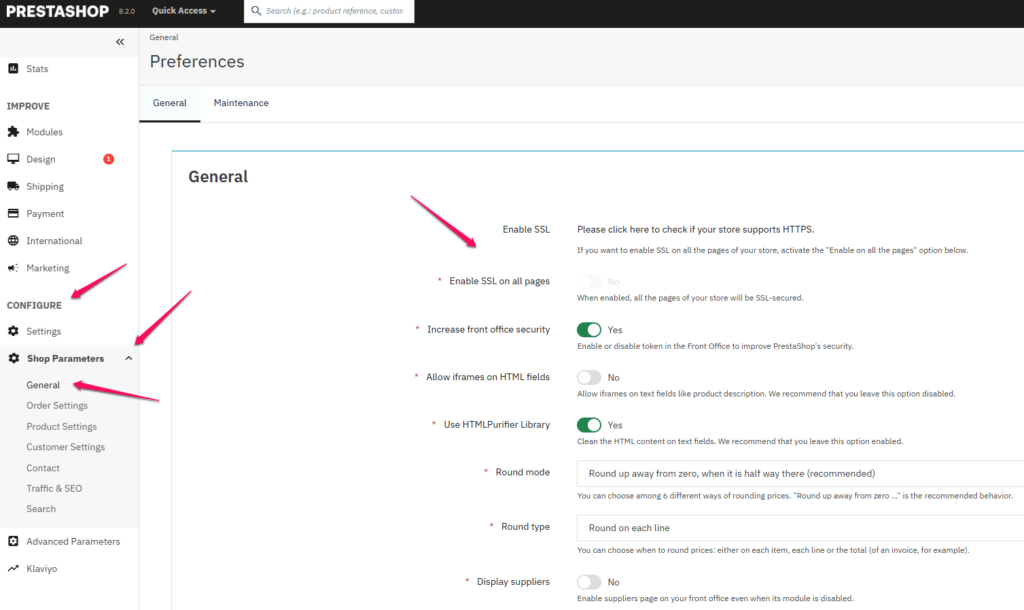
Step 3: Open the General Settings
From the left-hand menu, navigate to:
Configure → Shop Parameters → General
Depending on your PrestaShop version, the menu names may vary slightly, but the General Settings section contains the SSL configuration options.
Step 4: Verify HTTPS Support
At the top of the page, you may see a message indicating that SSL is not yet enabled.
Click:
Click here to check if your store supports HTTPS
PrestaShop will verify whether a valid SSL certificate is available for the domain.
If the verification is successful, the SSL configuration options will become available.
Step 5: Enable SSL
Locate the option:
Enable SSL
Set it to:
Yes
Scroll to the bottom of the page and click:
Save
Wait for the page to reload and confirm that the changes were saved successfully.
Step 6: Enable SSL on All Pages
After enabling SSL, a second option becomes available:
Enable SSL on All Pages
Set this option to:
Yes
Click:
Save
again.
This ensures that all pages of the store are served through HTTPS instead of only selected areas.
Step 7: Verify the Configuration
After saving the changes, PrestaShop should display a confirmation message indicating that the settings have been updated successfully.
The SSL options should remain enabled.
Visit your storefront and verify that:
- The URL begins with
https:// - The browser displays a secure padlock icon
- No security warnings appear
If HTTPS Is Not Working Correctly
If some pages still display security warnings:
- Clear the PrestaShop cache.
- Clear your browser cache.
- Verify that all images, scripts, and stylesheets are loaded via HTTPS.
- Check whether any modules or themes contain hardcoded HTTP links.
Mixed-content warnings are often caused by resources still being loaded over HTTP.
Summary
To enable SSL in PrestaShop, first ensure that an SSL certificate is active for the website in the mybox Panel. Then, in the PrestaShop administration panel, navigate to Configure → Shop Parameters → General, verify HTTPS support, enable SSL, and then enable SSL on All Pages. Once completed, your store will operate securely over HTTPS.