


Grav CMS is a modern, flat-file content management system that does not require a database. Content is stored directly in files, making Grav lightweight, fast, and easy to maintain.
Since Grav CMS is not available as an automatic installer in the mybox Panel, it must be installed manually.

This guide will walk you through the entire installation process.
Table of Contents
Before You Begin
Before installing Grav CMS, you should:
- Have a domain or website added in the mybox Panel.
- Create a blank website.
- Have access to FTP.
Unlike many other CMS platforms, Grav does not require a MySQL database.
Step 1: Create a Blank Website
- Log in to the mybox Panel.
- Navigate to:
Websites
- Click:
+ Add
- Select:
Blank Website
- Complete the website creation form and wait for the process to finish.
Once the website is created, save the FTP credentials displayed by the system.
Step 2: Download Grav CMS
Visit the official Grav download page:
For most users, we recommend downloading:
Grav Core + Admin Plugin
This package includes the administrative interface, making website management much easier.
Download the ZIP archive to your computer.
Step 3: Extract the Files
After downloading:
- Extract the ZIP archive locally on your computer.
- Verify that the Grav installation files are visible.
Step 4: Upload the Files
Connect to your hosting account using an FTP client such as:
- WinSCP
- FileZilla
- Cyberduck
Navigate to your website’s root directory.
By default, this directory is:
public_html
Upload all extracted Grav files and directories to this location.
Wait until the upload process is fully completed.
Step 5: Launch the Installation
After uploading the files:
- Open your web browser.
- Navigate to your website address:
https://yourdomain.com
If the files were uploaded correctly, the Grav installation wizard will start automatically.
Step 6: Create the Administrator Account
The setup page will ask you to create an administrator account.
Complete the required fields:
Username
Choose the username you want to use when logging in to the Grav administration panel.
Email Address
Enter a valid email address.
Password
Create a strong password.
Full Name
You may enter your first and last name or any display name you prefer.
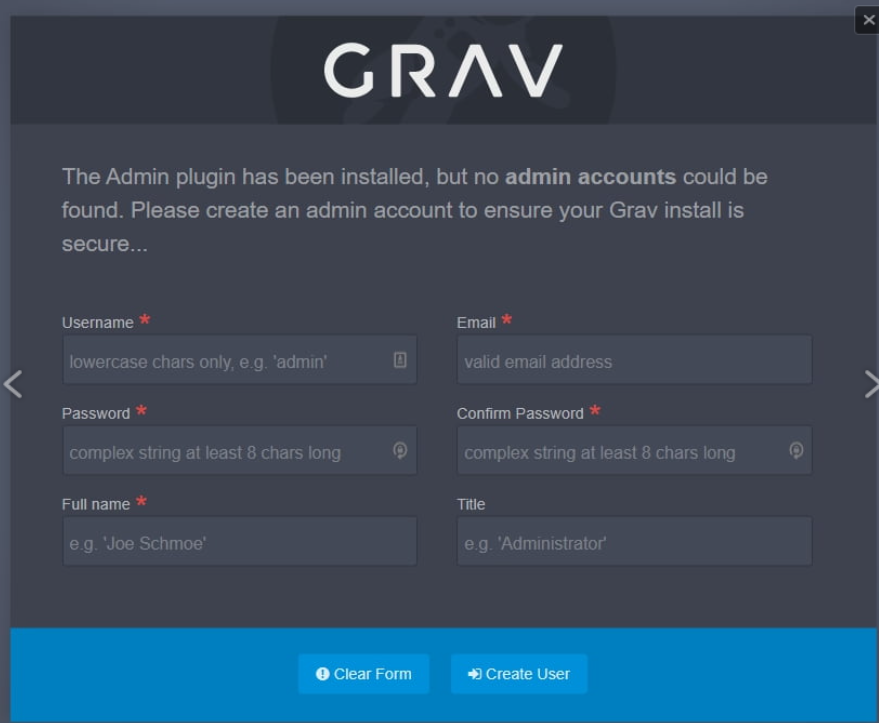
After completing the form, click:
Create User
Step 7: Log In to the Admin Panel
Once the account has been created, Grav CMS is fully installed.
You can access the administration panel at:
https://yourdomain.com/admin
Log in using the credentials you created during installation.
What Can You Do Next?
After installation, you can:
- Create pages and content.
- Install themes.
- Add plugins.
- Configure menus.
- Manage users.
- Customize the website appearance.
Advantages of Grav CMS
Grav offers several benefits:
- No database required.
- Fast performance.
- Flat-file architecture.
- Easy backups.
- Modern administration panel.
- Extensive plugin ecosystem.
Troubleshooting
If the installation page does not appear:
- Verify that all files were uploaded correctly.
- Confirm that the files are located in the
public_htmldirectory. - Ensure the domain points to the correct website.
- Clear your browser cache and reload the page.
If problems persist, contact the mybox support team through the:
24/7 Helpdesk
Summary
To install Grav CMS:
- Create a blank website in the mybox Panel.
- Download Grav from the official website.
- Extract the ZIP archive.
- Upload the files to
public_html. - Open your website in a browser.
- Create an administrator account.
- Log in to the Grav administration panel.
Your Grav CMS website is now ready for content creation and customization.